January 17, 2011

Magical Monday - Sketch Challenge

Hello everyone! Golly, I have been absent from here for some time now so it feels good to be back. Today I bring you a card I made for the Paper Cupcake's weekly challenge which is a sketch. I used the image "Girl with Heart" by Paper Cupcakes and colored here with my colored pencils. The ticket sentiment is from Paper Cupcakes as well and is from the Variety Ticket set. I made an easel card and like how it turned out, but my mojo wasn't quite there that day and it took me all day to get this one card together. Although, I did like how it turned out in the end. The punches are both Martha Stewart's. My papers were scraps.


This was the card I made last week for the Paper Cupcakes Challenge. It was to make a thank you card and then mail it. The image is from Paper Cupcakes and is called "Deco Flower with Flourish" I colored this image so long ago, but never used it, but finally did. I colored the image with Bic Mark-its and used some stickles on the flower. The border punch is from Martha Stewart. I loved how this card turned out.


Well, that's all for me today! Joy is contagious, commit to be a carrier.

December 13, 2010

Magical Monday - Christmas Card with Traditional Red & Green

This week Dru Cabral brings us the challenge over at the Paper Cupcake's challenge blog. The challenge was to make a Christmas card using traditional colors "red & green". Paper Cupcakes also gave away this cute snowman freebie called "A Merry Little Christmas". I came up with this design/layout and decided to use it a few times with a little change to each card. Makes it more simple that way for this time of year. I colored my image with my Bic Markets and colored the hat with my colored pencils.


You can still see the same sketch here, but I did the ribbon treatment a little different.


Kept the same design to this card as well and used the images "Santa's Helpers" and the sentiment is "Christmas Tickets" by Paper Cupcakes. I colored this image with colored pencils.


If my stickles looks messed up here, it is because it is! I laid another card on top of this card before it was dry, dang, I hate when I do things like that!


I wish on this next card I would had used a white card, but I went with black. Oh well, I may pick the rhinestones off and cut a small white piece and place it in the top right corner and place the rhinestones back on that. Something about that top black corner that I just don't like. I think a pop of white is what it needs. Tomorrow maybe. Colored this image "Snowman Angel" by Paper Cupcakes with Bic Markets, the ticket is "Christmas Tickets" by Paper Cupcakes. There is stickles on the wings and the little heart and star.


This image "Friendship Never Melts Away" was colored with color pencils and I love the pinks and green. I used a white glaze pen to put the dots on the trees. This card is simple as well, but I love how it turned out. I think you can figure this out.


This is the freebie I give away a lot on the blog. I really like it, but had not yet used it so I colored a large image of it. I colored it with colored pencils and added stickles to it as well. All these cards are 5x7 so you can see how large this image is.


I colored a lot of these images weeks ago and today I spent most of the day at an indoor swimming pool volunteering to time the meets of the swimmers to raise money for our mission trip group. It was the first time I have done this and it was a little stressful, because there was very little time between swimmers and recording the scores and then being ready for the next round, but it was fun plus we raised quite a bit of money as well. When I got home around 4:00 I jumped in and made most of these cards today/this evening. I have had a busy week and it doesn't seem to be slowing down with Christmas drawing near. Believe me I still have plenty to do. This is the last week of school for the children so they will be around all next week, which I am not so sure I like for the things I still need to get accomplished.

I did do a mural this past week in someone's bathroom. It was a bit hard to photograph, so these pictures do not to the mural justice at all. The trees are not nearly as dark as what is reflected here. They really do show up and do not blend in with the background trees. But the bathroom was narrow and I just could not stand right in front of the mural and take a straight on picture, oh well, I may go back and try to get a better one later. This measures about 4.5x 3 feet. The lady was pleased, so I guess that is just dandy! Truly my horizon line is straight, but like I said I was pretty much taking these from the side or stretching my arm out to take the pic.


Here is a link to the mural I did in my own home. My kitchen is Tuscany and this mural sits on the wall behind our kitchen table. Look closely at the tile wall at the bottom. There is real tile on the wall (12x12 pieces) and I actually painted the top part of the wall which looks like the tile. Thought for those of you who have not seen some of my work before it would be fun. I should post more when I do it, but I just don't.

OK, I am dead tired. We got quite a bit of snow on the ground today and so I know I will need to be up earlier tomorrow to clean it off the car ((ugh)). With 4.5 inches of snow now on the ground this beach scene looks pretty inviting! So, have a lovely day and thanks for stopping by and visiting me!

December 6, 2010

Magical Monday - Christmas Ornament

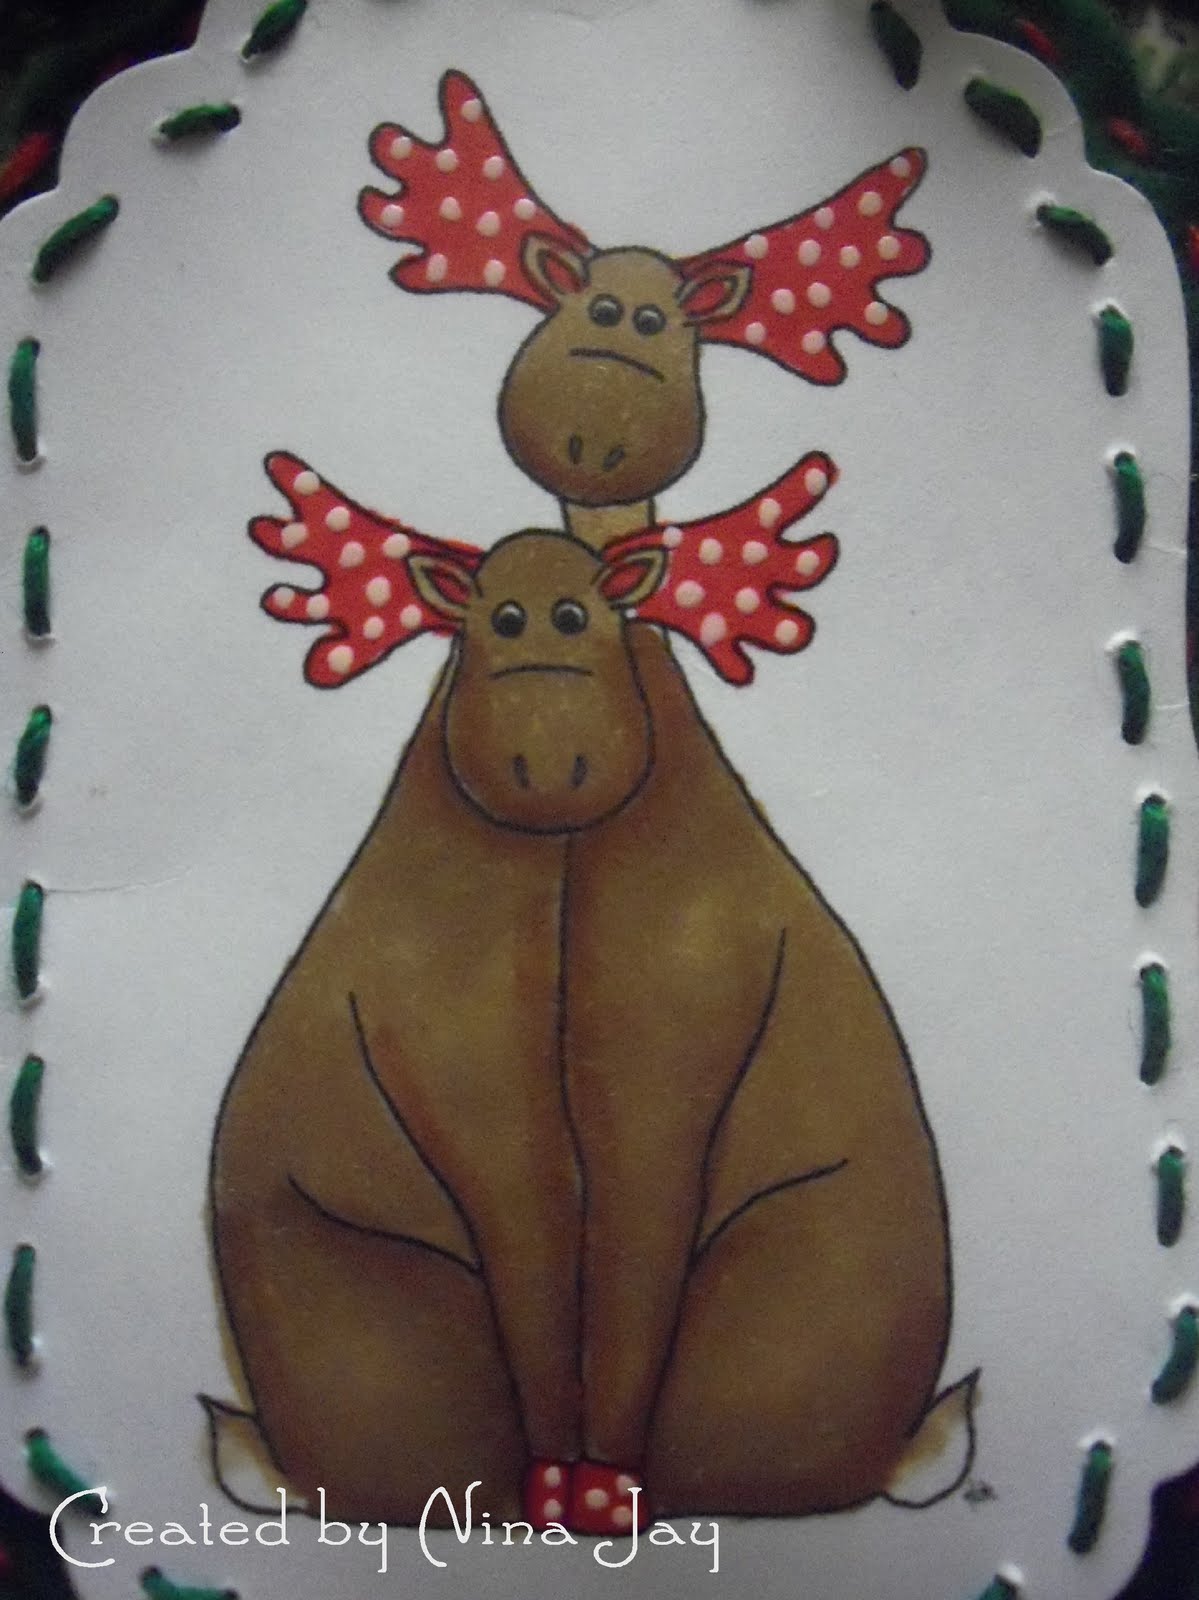
This week over at the Paper Cupcake Challenge blog Carol West brings us our challenge. She wanted to challenge us to make a Christmas Ornament. At first I was a little stumped at how I was going to do it and then I decided I would use some felt with my image and this is what I came up with. It is way cute in person and I actually added some Stickle around the edges of the image after I took the picture so these pictures do not have the Stickles on the main image. This is actually stuffed and sewn together and you can hardly see the red thread on the outside in these pics. I used my spellbinders to cut the felt and the image. I just really kind of created as I went along. The main image is from Paper Cupcakes and is called "Moose Couple" and the little ticket on the back is the "Christmas Tickets" by Paper Cupcakes as well. I colored my image with my Bic Mark-its and used a glaze pen for the white dots.


Well, we had an extremely busy weekend, gone each night and I am extremely tired. I will be starting a small mural tomorrow and hopefully I will finish in a day or two, so I don't have any of that together yet and need to head that way and then bed. So thanks for stopping by and make it a great week!

November 29, 2010

Magical Monday - Anything Goes

This week over at the Paper Cupcake's challenge blog Patti Painter brings us this weeks challenge of "Anything Goes". So, with that is is free range of creativity, which I love. I used the image Jingles; Flying High & Christmas Tickets by Paper Cupcakes. The dp is by DCWV and it already has the swirls on it with some sparkle, but I still added some Stickles on top of that. This is really a pretty simple card, just punched some holes on the sides and added all those little bow knots. Added the flowers, the punched snowflakes and rhinestones. I colored my image with both Bic Mark-its and colored pencils. I loved how this turned out and the color combo.


We had a lovely Thanksgiving and I made a full meal. Funny how long it takes to prepare and only minutes to consume, but it was a lovely day. I hope everyone in the US had a lovely Thanksgiving as well and those outside the US, well, hope your past week and weekend was just as lovely. Well, here's to another week, have a good one!


November 22, 2010

Magical Monday - Red & Cream

This week's challenge over at Paper Cupcakes is brought to us by Nilla Berglie. She chose the colors Red and Cream for us to work with this week as the challenge. I loved working with this color combo and made 4 cards. This first card I used the image "Angel" by Paper Cupcakes and colored her red with my Bic Mark-its and used a cream colored pencil to shade her dress just a little and a copic for her skin tone, but left her mostly cream like the card stock she was printed on. I did not have any cream and red paper so I used red pattern paper and lots of cream card stock. On my image after I colored her I cover the whole piece of card stock that she is printed on in a holographic heat embossing powder, then embossed it and it turned out beautiful. You could also use any of the tinsel or transparent glittery embossing powders. I have used the Embossing Tinsel - Bridal and then the Holographic and both work beautifully. I wish you could see this in real life, because it is beautiful and it was hard to photograph the effect so it reflected how it really looks. The third picture represents it the best I think.


The Joy is a die cut by Sizzix which came with some embossing folders. I cut it out in cream and then added all the color and doodling to match the bottom of her dress. I then added the bow.


I did the same technique on the outside of the cream part of the card that I did on the image and then added some Stickles to the red edge as well. I punched and made my snowflakes.


This next image is also from Paper Cupcakes and is called "Praise Him". The background paper is a much richer red than it reflects here. I colored the whole image with Bic Mark-its and her skin with copics. I added some pink to the edges of her dress, because I thought it would be a lovely contrast and added some red Stickles at the top of each ruffle. I distressed the edges, because I thought that would give it the feel I wanted.


The leafy vine is a Sizzix die called "branch with leaves". I used 3 of them to make the vine and then used the Martha Stewart punch for the little flowers and punched them in two shades of red, then added the little pearls.


I then added the lace and bow. I really loved how this card turned out and it was my favorite of all four.


These next two cards are quite simple and I try to keep them somewhat flat, or kind of one layered. I colored this image quite a while back in photo shop. It was probably one of my first I tried to do this in. I wouldn't say I was overly pleased with it, but I printed it out back then and so I thought I would just use them to make a few cards for Christmas. They aren't awful, but not great either. I kept these simple and just used my scraps from the other cards. I kind of wish I would had used cream ribbon for this top card to make my bows, but the red looks ok, and shows up a little better than this in real life. I still might add something to this, but not sure what, so I will just sit it aside for now.

This is the exact some image, just printed twice back then. I kept this card somewhat flat as well. I did my Stickles a little different on the vase. I like the above one better, but I do like the design to this second one.

Well, that's it for me for now. All these cards look lovely together here sitting side by side in the red and cream. It was a great color combo and I would encourage you to do something outside of Christmas with it. That is why I did the girl playing the guitar and she turned out so lovely. I can't believe this Thursday is Thanksgiving in the US! Time is just a flying by and and before we know it, it will be Christmas, then the New Year! So it will be a busy busy week, but I am looking forward to it. So, have a great week and thanks for stopping by!


November 15, 2010

Magical Monday - Glitter, Ribbon & X-mas Card

This week over at the Paper Cupcake's challenge blog, Pat Pedder brings us our challenge. She wants us to use glitter and ribbon and make a Christmas card. Well, glitter and ribbon are some of my favs and I love making Christmas cards. The only thing with this challenge was that I spent a day weeks ago making the cards for these challenges and then the DT cards starting pouring in and I soon realized I didn't use the assigned image; oops! So, needless to say I had to squeeze making this card in in between the basketball games during the tournament this weekend.

I used the freebie image by Paper Cupcakes "Who's Candy", the second time around :o) I colored it with my colored pencils and added some Stickles to it. I placed the hat, gum drops and the lollipop on the left on pop up dots. Punched my snowflakes and added my square rhinestones and the also added some on my ribbon bows. The dp is from one of my small DCWV stacks and the design is also glittery. I also added some liquid glaze on the lollipop that the owl is holding. The pictures are kind of dark, but I was taking them once again at 10:30 at night, so no natural light like I usually have to take them. This is much cuter and brighter in real life.


A big shout out to our Trojans that won the basketball tournament this weekend. The final game was a nail bitter and they ended up pulling it out in the end. Three of our players were named some of the All stars for the whole tournament and our cheerleaders rocked the crowd with their smiles and enthusiasm. As parents we were certainly proud of all the children. These tourneys take a lot of time and commitment and sometimes I dread them, but when I am there and in the mist of the excitement I do truly always enjoy them. Although now the weekend is gone and it is 11:00PM at night once again and my house is a mess, I also made a new recipe in the crock pot to eat when we got home. The children did not like it; Eric and I did. So if you have any great recipes for the crock pot I certainly could use them for basketball season which will be through February, so send them my way in an e-mail!

We also had a great message and powerful witness at church today from a veteran that was injured quite badly in road boom in the Iraq war and was also blinded, made me quite emotional as well. There was also a veteran that played the bagpipes which I might add was just awesome and when he played amazing grace, well, it was just very moving. All in all it was a great day and I have to say I feel very blessed and very exhausted. So, I am finishing up this post and also a glass of wine and then heading for bed to start another day. I am sorry I did not get around to blog hopping, but hope to this week. We only have one game (I think). I have to check the schedule! So, have a wonderful week and if you are adding glitter to your projects, glitter always makes the days better!


OK, I hope this doesn't offend anyone, but I thought this was just too funny! Who knows, maybe I will visit the snowcone stand this winter!

Photobucket

Photobucket