Showing posts with label card making. Show all posts

December 5, 2011

Magical Monday - Sketch

This week over at the Paper Cupcake's Challenge Blog; There's Magic In The Air. For the month of December I am going to be hosting the challenges. This week is a sketch. I always love doing sketches, mainly because it takes a lot of the fore thought out of the work and makes it a little easier and quicker.

This is the sketch I came up with. Of course you can flip, rotate it, and/or stretch it as long as when your card is finished you can still see the initial sketch in the card. I pretty much left it the way you see it.


I used the images Penguin with Candy Cane which is a new release & Christmas Tickets by Paper Cupcakes. I used Bic Mark-its to color the image, except for the blue that I used to outline with which was a copic. Punched my snowflakes and added some Stickles. I also used all scrap paper. I thought the yellow ribbon and the yellow on his sweater was a nice pop of color.


Well, that is it for me today. Thanks for stopping by and have a great week!


November 28, 2011

Magical Monday - Vintage Card or Shabby Chic

This week over at the Paper Cupcake's Challenge Blog; There's Magic In The Air. This week Sonia Rivera brings us our challenge. She wanted to see us make either a Vintage or Shabby Chic type Christmas card. This is always one of those challenges I am not sure if I am actually hitting the nail on the head when creating, but I love the distress look and inking along with homemade flowers and lace. So... with that all said, not sure which category you would place this in, so I will let you decide!

I used two images from Paper Cupcakes, Gingerbread Boy & Gingerbread Girl. I made several of each and made a little gingerbread line. I colored them with Bic Mark-its and then inked the edges with some cat eye chalks in brown. I dry embossed the red card stock and then I gathered some lace to run along the bottom and added some brown ric-rac on top of that. I made my flower using a large 5 petal flower punch. I punched some pages out of an old daily devotional book and then inked 6 flowers total; 3 red and 3 green and then placed a brad in the middle and then just scrunched them up for the look and fullness. I really liked how it turned out and have never made a flower like this with this particular punch. Added some brown buttons and then some white ink stitches and called it... well vintage or shabby chic...LOL... but mostly I called it completed! :oD


Well, that's it for me for this challenge not sure if I hit the vintage or shabby chic, but I do like the end result of my card and that is what really matters.

We had a very nice Thanksgiving. We got to spend some time with some family and then Friday we went downtown to the monument where they light the monument up. Fifty-two strands of lights are strung vertically from the top of the Soldiers and Sailors Monument to its base, for a total of 4,784 lights. Twenty-six larger-than-life soldiers and sailors, 26 peppermint sticks, and another 90,000 lights surround the monument. Santa's workshop was the theme of the stage where they put on free entertainment and where all the festivities took place. Over 100,000 spectators were expected to attend this year's ceremony and yes, we were part of those crazy 100,000 spectators that took part in the celebration. We had a good time and the temperatures were a nice 55-60 degrees, so we couldn't beat that. We parked far enough away so parking was not a hassle when it came time to leave.

I hope everyone in the US had a lovely Thanksgiving and for those who are outside the US I wish you many blessings as well. I hope we all can find something in our lives to be thankful for!

So, make it a great week and thanks for stopping by if you either came by to lurk or to leave me a lovely little note.


May 2, 2011

Magical Monday - Birthday Challenge

This week Julie Smith brings us our challenge over at the Paper Cupcakes Challenge Blog. She would like us to make a birthday card/project; it's that easy! I used a new released image "Dogwood Cupcake" by Paper Cupcakes. It is sitting in the store right now and I will be adding 10 more new images by the end of tomorrow.

I colored my image with my colored pencils and used some of my Stickles on the cupcake icing as well on the leaves and ticket. I wish you could really see how pretty the sparkle is, but I don't think it shows up that well in the pics. The embossing folder is Tiny Bubbles by Cuttlebug. I crimped my patterned paper and layered my flowers and punched my butterflies. This was a pretty easy card to make. I just loved how it turned out. The one thing I love about digis is that you can resize your image and this cupcake is fairly large. The card is a 5x7. Yum yum, it would be deadly if you ate a cupcake that large! :o)


Well, it stopped raining for two days and the rain is back. We did get our soccer game in on Saturday and the fields weren't too bad either, but the wind was a killer. I had a nice weekend, although it was busy, but hey I am use to that. Hope you had a nice weekend as well and now I am ready to start another week!

Make sure you stop by Paper Cupcakes and check out my new images in the "new arrivals" area. I am hoping to have them all up-loaded by the end of today. There will be a total of 14 new ones. Four are sitting there right now as I had to stop and move on to something else. If they all aren't there, come back a bit later in the evening (my ETS of course) and they should all be there (I hope). If by chance they all aren't there it is because I had to take my car into the shop. I have a hole in my raditor and will need to address this asap or otherwise I have no transportation. Car repairs stink!

So, have a lovely day and leave a message or a hi if you stopped by. I always love to read them.

March 15, 2010

Non-traditional Card Challenge

The challenge over at TMITA/PCC is brought to us by Kim. She wants us to make a non-traditional card. I made a slider card. My friend Curt posted this type card on his blog recently (found here) and he found it on Heather's Blog which you can find here. She has posted the instructions and a video on how to make it. It was really very simple and my card is super cute in real life. So, I gave it a try. I did make my slits a little longer because I wanted to add my other bunnies to the second and third tier, but that was easy and I did it as I went along. I used my Bic Mark-its to color it and used all scrap paper to make my card, which I love. Added some stickles, the ribbons and the flower and called it complete.


Well, that's it for me! I would suggest you make one of these, it was a lot of fun and mine turned out really cute and like I said it was really pretty simple as well. So, hop on over there and check it out.

February 22, 2010

Free Digital Image - "Lucky Bear"

This weeks image from Paper Cupcakes is this cute little bear image called "Lucky Bear". This weeks challenge is brought to us by Nilla and she asked us to distress. I distressed the edges of my paper with my scissors and then I also crumpled my paper and then pressed it back out. I really like this look on my cards. My sewing machine has been messed up for years with the tension so I figured I could use it because that would fit the look! :O) I so love real sewing on cards, so I got out my machine. I wasn't exactly sure how I wanted to use this card in regards to a sentiment, so I went with this little chipboard word that said "charmed". So I will most likely use it as a friendship card. Needless to say since I wasn't sure how I was going to use it, I have not finished the inside yet. There it a little tag that comes out that is under the image. I thought I would place the word "friends" on it, but haven't yet decided. I used glossy accents on my shamrock and the bear's nose and I also added some on the dots of the flowers on the green paper. Both papers are Paper Studio. I just loved it paired with the orange card stock.


Well, thanks for stopping by and I would feel very "charmed" if you left me a comment of lovins! :O) Have a charming day!

January 11, 2010

Free Digital Image - Miss Kitty

This week's FREE image over at TMITA/PCC is this cute image called "Miss Kitty". I ended up making a card to match this this cute little box in bag that I wanted to try a few weeks back, but didn't. So, I thought the pp would be so cute on this. I colored my image with my colored pencils. I also made my bigger flower that is on my card to match my pp out of just white card stock and I inked the middle and just drew on the black outline. I punched my hearts. Really, this was not a very over difficult project and was really a quickie for me, but I love how the set turned out. On my image I have a little green lines with the white, but it does not show up very well. At first my plans were to attach my "Miss Kitty" onto my box in a bag, but I printed her off a little bigger then what I thought worked well, so I just decided to make the set. I think the pp for the bag in a box works well by itself, but will probably add a cute little tag to dangle from the bow or I still might print off a smaller image and add it still. Oh, I also placed the heart and the bow on pop-up dots.


Oh I should tell you my pp is actually from the dollar store that I bought when I first started scrapping, but I think it is soo cute and wonder why I haven't used it yet... ummm.... I think I have lots of pp like that! LOL... how about you? I would challenge you to pull some of your oldest pp out and use some of it up, you might find that you just might fall back in love with it!!

January 4, 2010

Free Digital Image - Painted Pony

This card if for the color challenge over at TMITA w/PCC. The FREE image is called "Painted Pony" and if you missed out on the freebie you can find it in my new store Paper Cupcakes. If you haven't been by my store, make sure you check it out. It holds a lot of new digital images that you cannot get anywhere else. They are my originals.

I loved this color challenge that Patti Nelson brought us this week. I love it when the challenges include colors and/or sketches, mainly because it takes a lot of my thinking and decision making out of it. I decided to do another easel card. Although, instead of doing it square I decided to do a 5x7 that would fit into one of my envelopes. It doesn't quite stand the same, but none-the-less turned out cute and I was satisfied with it.

I colored my images with my colored pencils. The tree is a stamp by Stampabilities called "Heart Tree". The stamp is actually only about 2 inches high, but I really wanted a bigger tree and didn't have one (I know I should have just drew one) but I really love this stamp, so unlike digi's where you can just enlarge them (which is one of the things I LOVE about digital stamps) I decided to stamp this and just enlarge it on my copier (is that legal?). The enlarged tree is about 4 1/2 inches and then cut it out after coloring it. I decided to cut grass to hold up my easel and actually did 2 layers one on the base and one on the front behind the pony. I got some fancy smancy scissors from my neighbor/friend Bea/Carl for Christmas that has five blades on both sides and was perfect for cutting my grass and I was excited to actually use them on a project verses just cut things up playing! Thanks Bea! I really loved all the design detail on this pony and had a lot of fun coloring it. I added glossy accents to parts of the designs on the pony and also added it to the red heart on the tree. I placed my painted pony on pop-up dots to make him stand out just a bit as well. I drew the sun in the top corner and added some color to that as well with my pencils and then added some glossy accents to that. Added a little butterfly and thought it looked like a perfect day for a pony out in a field. I really loved how this turned out, but I think my easel part could stand up a little higher and straighter, so I will be working on a way to perfect this size of card in making it into an easel card for easy mailing!

This is what the front of the card looks like prior to folding it out into an easel card:


A more close-up shot with both layers of grass:

The full easel card:


My black is actually blacker, but I think the light washed it out! Thanks for stopping by and taking a look and I hope you can find some time to play along with us as well over at There's Magic In The Air!

December 28, 2009

Magical Monday at TMITA

This week over at TMITA the challenge was to use any of the previous free images or the one posted which was a past free image or one from my new store Paper Cupcakes. All of the designers got to pick whichever image they wanted to work with from the store. I went with the image "Beary Nice Dance" . I made this image while on vacation in Tenn. and thought it would be fun for this challenge. Since we were suppose to incorporate something found in a New Years celebration or something that sparkled, I chose to place fireworks going off in the background. I used glue on a stamp with glitter. I have never really done that before and not sure if I like it more them embossing it... but it worked and looks great behind the dancing bears, but I truly love heat embossing. I chose to place the fireworks on black so it seemed more like evening and so they would pop. I colored my bears with my Bic Mark-its and cut them out and placed them on pop-up dots. I punched my little flowers and added some rhinestones to the middle. I also added a lovely green ribbon with a sparkle and gold trim. The sentiment is computer generated. I really liked how this turned out. I think this card has a happy feel to it and I can just imagine these two bears dancing at midnight in the deep dark forest under the fireworks having a delightful dance of romance!


So, have a "beary" nice day and have a safe and Happy New Year!

October 19, 2009

Free Digital Image - "Harvest Geese"

Here is my card for the Magical Monday over at There's Magic In The Air. This week's challenge was brought to us by Curt and we were suppose to use pop dots or foam squares to make something pop. I actually popped my sentiment only because I made this card a while back and thought I would have time to make another, but didn't. If I would have popped something up on my image it would have been the fence and maybe the white pumpkin and the goose on the right. I made this card with scrap pp so I can't tell ya who made it. The lace is from my mom and I punched out circles and placed 1/2 of them above and below the image and added some red rhinestones to each. I added a layered flower because it brought all the colors together and I loved what Dawn did with her ribbon when she sent her card to me so I lifted the idea and did three smaller versions! I colored my image with color pencils and it is actually a little more rich in color in real life.


Well, that's it for me, hope you enjoyed your visit, leave me some luvins and let me know what you think, I love hearing from you!


September 14, 2009

Deco Flower - Magical Monday

This weeks challenge over at There's Magic In The Air was to emboss (heat or dry) or score something on your card. I wanted my card to be more contemporary so I leaned towards that. Leigh Anne knows just how much I LOVE to emboss, heat embossing is my favorite, but I love how easy dry embossing has become with all the folders now.

So, I decided this image would be a great image to duplicate so I made three to place on this first card. I colored these with my Bic Mark-its. I then added that gold heat embossing around the edges of each image. Then I chalked the back ground with the some colors in the image. I basicially just showcased the images. I placed black stickles on the center of the flower and the dots above it, but that is hard to tell. I dry embossed using a cuttlebug tiny bubbles embossing folder. Then just added some gold trim to match the embossing and three black jewels for some detail. This card was extremely hard to photograph, not sure why, but it truly was.


I pretty bascically did the same techniques here with a different design; and of course I just used one image and added the butterfly!


I really wish you could see these in real life, they are so much prettier! Sometimes, I really don't think the camera catches just how beautiful our cards really are, but oh well, you will just have to believe me on this!

This card I made fairly quick for a thank you a while back prior to this challenge. I added a lot of dots around the flower top to this image. I must say I really like this image.


Thanks for stopping by, leave me a measage it certainly MAKES my day!

September 7, 2009

Nate & Av - You're Special

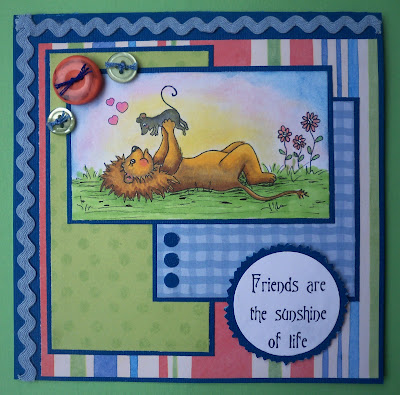
Yes, that's right is another Magical Monday over at There's Magic In The Air! This week's FREE image is this super cute lion and mouse that are pals! The name of this image is "Nate & Av - You're Special". Just in case you are wondering the lion is Nate and the mouse is Av. Since I am the artist you might be interested to know a little interesting fact about this stamp image (soon to be series). I have an 18 year old son (well soon to be) and a 6 year old son. This image was designed with them in mind. I often look at them when they are wrestling around or messing around and I am always telling Nathan to be careful with Avery because he is so much smaller in size. I am always scared he is going to hurt him unintentionally. So, I thought how fun to make a stamp of buddies were their admiration for each other was so big, but their sizes were such the opposite. Now I bet you can figure out where their names came from too!

This card followed this lovely sketch provided by Nilla one of the Designers. So, with this sketch you could turn it, flip it or whatever, as long as you can still see the sketch in it. So, I did just that I flipped it vertically. I loved how my card turned out with the sketch; super cute. I colored my image with my Bic Mark-its and chalked my sky in yellow, pink and blue which also has a shimmer to it, but you really can't see it here. I added some buttons with floss and then I just punched out three blue holes to add the three elements on the one section. Added my sentiment on a pop up dots. Then added my ric-rac. I just LOVE ric-rac! I also drew some extra flowers on the side in the image. I always leave space for things like that in case people want to add things to the image. I am one of those people that will do stuff like that.


Can't you feel the love...


Well, that's if for Nate & Av. So, why don't you go snag the image, play along and make a card and send it to someone and let them know that they too, are Special!

August 23, 2009

Cuttlebug Embossing Folders + Paper Rose = Beautiful Project

So, while visiting Curt's blog over the last few weeks I was inspired to come up with this completed project. He had posted these wonderful cards that really were fairly simple because the cuttlebug embossing folders did so much of the work. I think we all sometimes forget how truly wonderful these little folders are all by themselves. Yes, this post just emphasized just how wonderfully they stand on their own. So, first thing I thought was I would case them. Although I didn't have any of the folders he used, mainly because I wasn't sure how I would use them with other things, now I will have to buy some of them (thanks Curt). So, since I knew I wanted to make this as a gift set of cards I knew I wanted to put them in something that was more a keepsake once the cards were gone. So, I went to Hobby Lobby and bought one of those little brown paper mache type boxes. So, just like the cards I wanted the box to reflect the same kind of texture and look. So, this is what I came up with.

Below is the complete project: (double left click the picture for a much larger view)


The card stock on the box is from the Green Stack from DCWV and has little brown dots and also had those scrolls already on it. I sent the pieces through the cuttlebug to emboss and the sanded the embossing. I then added a gold metallic rub-on to the top of that to give it a more vintage look. I did that all over the box. For the lid I started off adding some ivory lace to keep with the Victorian feel and added a brown ribbon on top of that. I knew I wanted to use one of those paper roses that Helen had posted a tutorial on her blog a few months back that I had never made, but thought they were beautiful and wanted to give one a try.


I added a friendship verse that reads: If I had one gift that I could give you, my friend, it would be the ability to see yourself as others see you, because only then would you know how extremely special you are. I also added a little butterfly to the side to add some interest.


I really wanted to keep the overall box fairly simple and beautiful. I wanted the embossing, the verse and the simplicity to stand out. With the rose I added pearls to the top and coated them with a golden paint to make them match the rose and added some black crystals swirls as well. To not over due it, I left it at that.

I just loved how my rose turned out. I started with a golden yellowish orange card stock and followed the instructions on Helen's blog. I added to the edges of the hearts (see tutorial) Tim Holtz mustard seed distress ink. Then I went back and added a pink from color box right over the mustard seed. After putting the rose together, I then sprayed it with a purple glimmer mist. Then I went back once more and added a yellowish metallic rub-in to the tips of the rose petals. Once it all dried I also sprayed it with a "Deft" satin lacquer spray to seal it. I really do love how this overall project finished out.


I am such a "matchy" kind of girl, I wanted something on my envelopes to match my cards, so I decided to embossed just the flap on the envelope with the folder that matched the card. I was so pleased, an envie that matched!


The next two pictures is the set of all eight cards that will be placed in the box as a gift set!


I agree with Curt, this project is so much more beautiful in real life I wish you could see it in person. My box it much richer also in color, but I love how it turned out and I am sure I will be making these again! Thanks again Curt and Helen for the inspiration incorporated into my project!!

Thanks for stopping by and have a cheekie day!

August 17, 2009

Gate Fold Card - Beached Boat

This is the card I made to play along with the Magical Monday challenge over at There's Magic In The Air (TMITA). For more details check out the blog here. The image is free for this week only.

This is only my second gate fold card that I have made and I really liked how it turned out. I picked a soft blue for the overall feel of the card. I think the image is a very calm and peaceful and so I wanted to use it for a friend who is going through some cancer right now. I wanted to make a card I could send to him, so this is what I came up with.

This is a picture of the card all closed up.


To open the card up you turn the photo anchors to the side of the image and sentiment and then the image slides out from under the sentiment. I hope they can figure it out! I am hoping if he doesn't figure it out, his wife will.


Below is the card all opened up. I left the inside pretty simple, but lined it with a pretty pattern paper. You can see the backside of the image at the top left and the backside of the sentiment at the bottom right. That might give you an idea how it works.


I colored my image with color pencils and then I did my sky with chalks, although I did add a little more yellow to the sky with my colored pencil, but the sky is mostly chalks.

Well, that's it for my gate fold! If you have never attempted a gate fold card before you should give it a try! (there is a link on the TMITA blog on how to make one). Stop by the blog and check out what the DT and GD's did with them, they all turned out great and of course they all are soo different!

Thanks for stopping by and have a great day!