March 5, 2012

Magical Monday - Children's Birthday

The challenge this week is "Children's Birthday" at the Paper Cupcake's Challenge Blog; There's Magic In The Air. I thought this was a great for me on this particular day, although I am not a child, it is my birthday today! So, of course I picked the image from Paper Cupcakes called "It's My Party". I colored the image with my Souffle 3-D opaque Ink Pens. I love how different these look, although you can't really shade with them, I still love the look of them. I kept my card fairly simple. Criss-crossed my ribbon on each section piece and instead of adding bows I added fiber to give is some fun fuzzy texture and then added some lines of pearls & rhinestones. Added a touch of Stickles to the crown and wand for a little sparkle and called it complete.


This month has just flown. Our dog Millie just over a month ago was diagnosed with a detached retina. We took her to an emergency clinic and seen an optamologist shortly after that. They put her on pain meds and we watched it for a few weeks. One night I literally thought she was dying, mainly because she seemed in so much pain and wasn't really responding to me much. I ended up getting some more meds and took her to the vet the next day. Her eye pressure was extremely high, which a normal dog's eye pressure is usually around 10-12 and hers was 57! I ended up taking her right into emergency eye surgery which was to remove the eye. So we did that and they also found a benign tumor behind her eye which they removed as well. She just got her stitches out last Thursday and she is doing great and is glad to have that cone off. This is her new look now and we are getting use to it. It certainly doesn't seem to slow her down at all. We can't thank the wonderful vets enough that seen us through it all, there were 4 different ones totaled and I loved them all, but I truly appreciate the South side Animal Hospital that took her into emergency surgery and was waiting on my call after we visited the optamologist. They were the best! Anyway, she is doing great and I am sure she knows and feels she is deeply loved.


This past Saturday Morgan my youngest daughter went to sectionals for speech. She does a duo with another girl which is funny in content. I really did not know what speech was prior to her doing it and it was nothing like what I imagined it to be. There are lots of categories and nothing like giving a speech. It is more like acting and doing improv, but not. That is the best I can describe it. Anyway... Her and Christa took second overall in their category and their school took first place overall the schools in their sectional. It is won by a point system. So each time a child wins in their category they get points for which place they took and their school walked away with the highest points which landed them in first place over all. They are crazy talented kids and a joy to watch on the stage and off. Well, anyway here is a picture of the group that went to sectionals. They are off to State now and that is in a couple of weeks. We are lucky that it will take place close to home, which is really nice!


Morgan is the cute one left of the trophy holding her red ribbon and the girl to the left of her is her partner in the duo. These kids work a lot of hours and it looks like it is paying off. I hope they rock State!

And here is a project I just did for a friend. She wanted to give her friend some personalized wine glasses and asked if I would paint them. She wanted butterflies on them and this is what I came up with:

I actually painted eight so she will get two in each color. I loved how they turned out. I would have only did one thing differently. I did the bases with the white and black dots, but I did both glasses in each the colors with the same colored dots. I wish I would have did white dots on one pink glass and black dots on the other pink glass and so on in all the colors. This way all the glasses would have been different, but alike and and the dots would have made that difference. Not sure if that makes sense to you, but I know what I mean and oh well, next time. I love these so much I think I will have to make myself a set!


For anyone who would like to attempt this I thought it was pretty easy and it would make a lovely gift. I used only six colors and the type of paint I used was FolkArt enamel for glass and ceramics (total: about 2.00 a bottle; can buy at Wal-mart or any craft store). You bake the glasses once they are complete (follow instructions on the bottle) and that sets the paint. It is suppose to be top shelf dishwasher safe, but if it were me and someone took the time to hand paint them, I wouldn't risk the dishwasher and would hand wash them. Maybe I will try a piece of glass and run it through the dishwasher to see how it holds up. I also made my own template for the butterflies and did not buy one. I just used my butterfly punch by EK and punched a border long enough to go around the glass. It lined up a little funny so I had to cut one butterfly off and add a smaller one to the fill in where it did not line up just right. I used re positional spray adhesive and then stuck it on the clean glass. I then added the paint and took the template off immediately after painting all the colors. This works the best while the paint is still wet. Otherwise it tends to tear off some of the paint that dries to the template. Then I cleaned the sticky off with a q-tip and some alcohol and then repainted the butterflies with another coat of paint to make them more crisp. Then I went and added all the details freehand. This was a lot of fun and the first time I have ever done anything like this. It certainly won't be the last. I am seeing some lovely Christmas gifts forthcoming! Wouldn't a truffle bowl be lovely? You could always print off a design and tape it on the inside and then just paint over the design too. This could be some endless creativity and fun.

Also, I want to lift up all the communities that have been dealing with the deadly and devastating tornado's that went through. We had some in Indiana, but they were much further South and missed us. I have a bad feeling this is just the beginning of a really scary spring storm season and living in tornado alley does not thrill me. My heart goes out to all of the communities and people and especially to the ones that lost love ones. Some truly sad stories there. So, holding all of that in prayer, because we certainly can't make sense of it all.

OK.. That's if for me and thanks for lurking by. I hope you enjoyed my post today. If you have any questions regarding my painted glasses feel free to e-mail me or leave your question in the comments and I will get back to you.

So, Happy Birthday to me and to anyone else that shares my day! Make sure you stop by the Paper Cupcakes challenge blog I have left a little freebie there in celebration of my birthday!


Have a joyful day full of everday ordinary kind of blessings!

February 20, 2012

Magical Monday; All Critters Great & Small

The challenge this week is "All Critters Great & Small" at the Paper Cupcake's Challenge Blog; There's Magic In The Air. I made another surprise pop up card this week. I think this might be a new fav of mine! You can find a tutorial HERE. I also helped my mom and neighbor make one and they both turned out really cute. I should have taken pictures of them so you could see them.

I used the image "Izzy & Pouch; Happy Birthday" by Paper Cupcakes. I personally love thus cute little image! I used Bic Mark-its to color the image and added some stickles to the water and the edges.

I took this in the sunshine, but I think it might have been a little too bright. It cast a dark shadows in some of the pictures and you can't see all the detail, ever though there isn't much detail.

Also, there is a little staple on the ribbon and it has the work HAPPY on it and you can't see that either, but that is the Happy to Happy Birthday to you on the tag.


It has been a rough week with our dog Millie and her detached retina. She was in so much pain one night we had to have them call in some more meds and then the next day I spent most of the day at the vets. She ended up going in for emergency eye surgery to have her eye removed, because the pressure was too high. They found a tumor behind her eye which most likely was the cause for the detached retina. She is recovering well and seems to be getting around just fine, outside have to wear that cone. We haven't gotten any news back yet if the tumor is cancerous or not, I want the call to come in, but then again, I am a bit worried to hear the answer in case it is not good news. We have had a busy week and weekend with show choir competitions and next weekend is crazy with pinewood derby, more show choir and attending a surprise b-day party for one our friends. A nice nothing to do weekend would be great about now! Have a great week and thanks for lurking by!!!

February 7, 2012

Wow, I can't believe I am actually blogging two days back to back! Just kind of wanted to post some odd pictures of some things I have made or did over the last couple months that were actually something other than a card.

This first picture is a canvas I made for our school's annual dinner auction. The dinner/auction is to help raise money for our school; of course a good cause! Since the school our children go to is a Christian school I wanted the piece to reflect that. So I decided I wanted to do a picture with all the children's and staff's fingerprints, but then you run into making a piece that is fun and looks more then just a canvas with finger prints stuck on it. Since I loved the "UP" movie I kept thinking of the bunch of balloons that lifted the house up and thought "ummm.... a bunch of balloons would be nice. I originally drew a simple drawing of the front of the church and was going to attach the balloons to that, but I didn't want the canvas too big and it was already 20x24, not real big, but not too small, but adding the building I would have had to go up to a 24x30 canvas, so I decided to leave off the house and in place of that I did the verse "Once Jesus touches your heart, the fingerprints last forever." So, after I figured out the design I ventured out to get the prints at school this past week and then placed their first name on top of their print. I color coded each class and the key is on the back of the canvas. (so first grade was blue, second was red and so on..) I actually placed each finger where I wanted it, mainly because I wanted the colors to be spread out and the overall shape in a heart. Hope that makes sense. After having all the prints I came home and drew a balloon around each print and then strings to each print and "tied" them to the word Jesus. I just loved how it turned out and I think the children really thought it was cool. I did a big cross for church many years ago with the children and had them each paint a tile and then my dad made a cross for me to place all the tiles in. The cross hangs in the main room which is part of our church/school and the children still still love to go and find their tile (and they have grown quite a bit since then). So I know the children will continue to love finding their prints as well.

This is the finished canvas. It looks a little weird, because I forgot to take a picture of it before I place the plastic wrap over it. So you can see the wrinkles of that and it was a harder to photograph because of that. Oh well, you get the idea. This would make a great project for any school or class or even a family tree type project. I used my cat eye chalk inks for most of the prints and then sprayed the canvas with Deft to seal it. I also place a cute ribbon all away around the side edges which gave it a nice finished look.


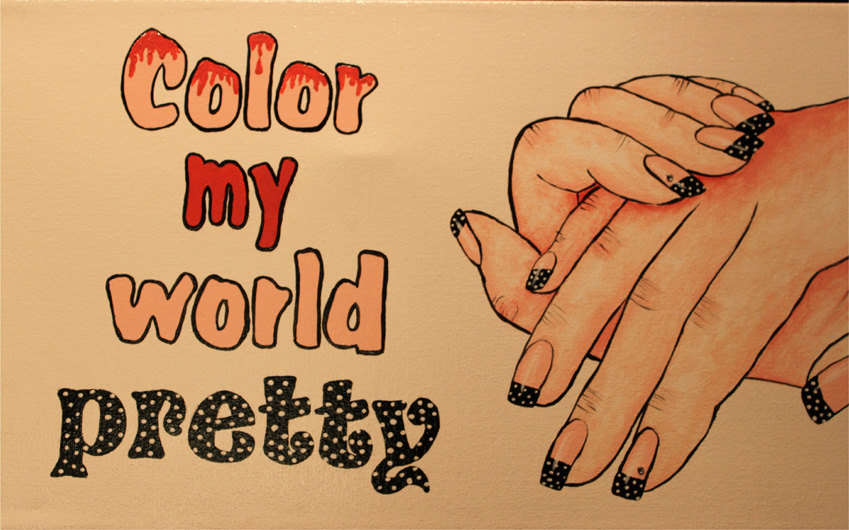
These next pictures are a canvas I did for the lady that does my hair. She has her own salon outside her house and I painted the salon walls a few years back and made two custom painting for her on canvas in black and white and added a touch color that I painted her walls with; back then. She also does nails, but I never get my nails done, but every time I go I see a dead spot that I felt needed a piece of art, which was above where she did her nails. So, as a Christmas gift I made this canvas for her. Not sure why I have such trouble photographing artwork on canvas, but I seem to! I also put ribbon on the outside edge of the canvas and it was black with white polka-dots like in the lettering and nails. I think it turned out cute and she seemed to love it. That orange/red and pinkish colors are the colors of her walls.


This is a quick card I made my girl friend for a recent birthday and just now getting around to posting it. The image is a new release at Paper Cupcakes-Stamps called Frilly Cupcake.


These are my daughter's fingernails that I painted a few weeks back. We seen this somewhere on the internet and so I gave it a try. They looked really cute with the orange and they were fun fun fun!


This is a cake I made back in December for a church function "Advent by Candlelight". I hosted a table and we were all asked to bring a special desert to share. This is what I made. It was a Raspberry Torte and it was YUMMY! Although it got a little "cockeyed" and slid a little on the way to church. It was a lot of fun to make and so so yummy too. The chocolate sticks were way fun to make and stick in the cake. Easy too. It made a lovely presentation, but a little harder to cut with all that stuff on top, but we managed to eat all of it.


Thanks for stopping by to lurk and if you read half of this I have to give you a big thanks! Now off to pick up from school!! Make it a great day!

February 6, 2012

For Someone you love - Magical Monday

It's create something for someone you love challenge over at the Paper Cupcake's Challenge Blog; There's Magic In The Air. Plus a color challenge. You have to use pink & white and any other color "except" it "can not" be red. I chose green. I made a surprise pop up card. You can find a tutorial HERE. I seen this somewhere and thought I was up to try a new design and I love slider cards. I think it was pretty easy too.

I colored my image with my Bic-Mark-its and outlined it with a light blue copic. If you look closely you will see that my punched border actually moves when my image slides up. I thought that was pretty clever. I did this mainly because it was a little more of a challenge to add things since the image slid. I only connected that part to the part the slides and left the sides unattached (hope that makes since).


Oh and I forgot to mention this is a freebie image this week over at that Paper Cupcake Challenge blog, so make sure you snag it quickly, because it will only be there until Wednesday!

So, I highly suggest that if you haven't made a card like this you go to the tutorial and give a surprise pop up card a try!

Well, I am going to try to post another post tomorrow or Wednesday to post a few other things I have created in the last couple of weeks, but this one needs to get posted and I need to finish dinner!

Thanks for lurking by I always love luvins, but a good lurk is good too! Make it a joyful week!

January 23, 2012

Magical Monday - Be Inspired

It's a be inspired challenge over at the Paper Cupcake's Challenge Blog; There's Magic In The Air.

The below picture is what you were suppose to get the inspiration from and create anyway it moved you to create.


This is what I came up with:


I used my colored pencils to color the image and added some stickles on the icing. It is a fairly quick and simple card. I mainly went with the colors and the swirl of the lollipops in the horn. Thanks for lurking by and have a great week!

January 9, 2012

Magical Monday - From The Heart

This week over at the Paper Cupcake's Challenge Blog; There's Magic In The Air.Paper Cupcakes is kicking the year off with a challenge that is "from the heart". The challenge is to use an image that has a heart in it and your overall card has to be some kind of thank you card or card of encouragement.

The twist to this challenge is after you have created it you are challenged to send/give it to someone who has touched your life with some type of kindness over these last several weeks or someone that needs some type of encouragement/lifting up.

So of course I used the freebie image "Know In Your Heart" that Paper Cupcakes is giving away for free this week, but only through this Wednesday, so make sure you snag it or you will miss it.

I used color pencils to color this and kept the design pretty clean and simple as I want to attempt to mail this without too much hassle, although the bow could cause me some minor problems.

I didn't want it to look too Eastery, so I tried to stay way from the pastel and bright colors and kept it more to earth tones with some blues.


I have several people in mind who I might send this too, so until I have made that decision I can't tell you right now who it is going to. I have several thank you cards to write, so I think I will be doing that this week and this will be one of them.

So that's it for me for this challenge. I hope you had a wonderful Christmas and here's to a Happy 2012 filled with good health, family, friends, love and many blessings we take note of! Thanks for lurking by!

December 19, 2011

Magical Monday - Bird Image

This week over at the Paper Cupcake's Challenge Blog; There's Magic In The Air. This is the last challenge of 2011 at the Paper Cupcake's challenge blog. I bring the challenge of anything goes with design or layout, BUT you have to use a bird image of some type on your project..

I used the freebie image "Welcome Winter" that Paper Cupcakes was giving away as the freebie this week, as well as the sentiment that came with the freebie image. I colored my image with colored pencils and used chalk for the color of the sky. I used stickles to add a little sparkle in the snow, around the light on the post and the hat on the bird.


Although this was a fairly simple card I am up way too late this evening (1:09AM) typing this up right now. So, I am going to keep this short and sweet and thank you for stopping by and an extra thanks if you took some time to leave me some luvings. I hope you will stop by and grab the freebie this week it will be up all week and it is super cute if I do say so myself.


If I don't get around to blogging in the next few weeks, have a blessed Christmas and a Happy and safe New Year!!

December 12, 2011

Magical Monday - Winter Fun with Bling

This week over at the Paper Cupcake's Challenge Blog; There's Magic In The Air. For the month of December I am going to be hosting the challenges. This week I wanted to see everyone do some "winter fun". Using a image reflecting some winter fun such as sledding, skating, a snowman etc. With a twist of adding some bling as well to your project.

I used the image "Winter Fun" by Paper Cupcakes. I colored it with my colored pencils. I used chalk for the color in the snow and sky. I added some stickles for a little sparkle in the snow and used a white glaze pen to add some snow falling all over the image. I used scrap paper from my scraps and pre-made snowflakes from K&Company that I bought on clearance some time ago. My sentiment is computer generated. Kept it pretty simple and I love how the touch of black & red just makes it pop.


Had another busy week and a packed full weekend. My daughter does speech and she had a meet this weekend and she did a scripted duo with a friend and they walked away with first place this meet for that category. I was so excited for her since she is a freshman and this is her first year in speech. Her teacher has great plans for her if she continues in the years. Let's hope she sticks with it, because she is quilt the talented. It was a proud moment for her and for us. School has one more week before Christmas break. Which means I need to get in gear and get things completed before their release so I can enjoy the week prior to Christmas with them home and not feel stressed and rushed, so wish me luck for an organized task accomplished week!

That's it for me. Have a great week and remember to enjoy your time and days during this busy season!


December 5, 2011

Magical Monday - Sketch

This week over at the Paper Cupcake's Challenge Blog; There's Magic In The Air. For the month of December I am going to be hosting the challenges. This week is a sketch. I always love doing sketches, mainly because it takes a lot of the fore thought out of the work and makes it a little easier and quicker.

This is the sketch I came up with. Of course you can flip, rotate it, and/or stretch it as long as when your card is finished you can still see the initial sketch in the card. I pretty much left it the way you see it.


I used the images Penguin with Candy Cane which is a new release & Christmas Tickets by Paper Cupcakes. I used Bic Mark-its to color the image, except for the blue that I used to outline with which was a copic. Punched my snowflakes and added some Stickles. I also used all scrap paper. I thought the yellow ribbon and the yellow on his sweater was a nice pop of color.


Well, that is it for me today. Thanks for stopping by and have a great week!


November 28, 2011

Magical Monday - Vintage Card or Shabby Chic

This week over at the Paper Cupcake's Challenge Blog; There's Magic In The Air. This week Sonia Rivera brings us our challenge. She wanted to see us make either a Vintage or Shabby Chic type Christmas card. This is always one of those challenges I am not sure if I am actually hitting the nail on the head when creating, but I love the distress look and inking along with homemade flowers and lace. So... with that all said, not sure which category you would place this in, so I will let you decide!

I used two images from Paper Cupcakes, Gingerbread Boy & Gingerbread Girl. I made several of each and made a little gingerbread line. I colored them with Bic Mark-its and then inked the edges with some cat eye chalks in brown. I dry embossed the red card stock and then I gathered some lace to run along the bottom and added some brown ric-rac on top of that. I made my flower using a large 5 petal flower punch. I punched some pages out of an old daily devotional book and then inked 6 flowers total; 3 red and 3 green and then placed a brad in the middle and then just scrunched them up for the look and fullness. I really liked how it turned out and have never made a flower like this with this particular punch. Added some brown buttons and then some white ink stitches and called it... well vintage or shabby chic...LOL... but mostly I called it completed! :oD


Well, that's it for me for this challenge not sure if I hit the vintage or shabby chic, but I do like the end result of my card and that is what really matters.

We had a very nice Thanksgiving. We got to spend some time with some family and then Friday we went downtown to the monument where they light the monument up. Fifty-two strands of lights are strung vertically from the top of the Soldiers and Sailors Monument to its base, for a total of 4,784 lights. Twenty-six larger-than-life soldiers and sailors, 26 peppermint sticks, and another 90,000 lights surround the monument. Santa's workshop was the theme of the stage where they put on free entertainment and where all the festivities took place. Over 100,000 spectators were expected to attend this year's ceremony and yes, we were part of those crazy 100,000 spectators that took part in the celebration. We had a good time and the temperatures were a nice 55-60 degrees, so we couldn't beat that. We parked far enough away so parking was not a hassle when it came time to leave.

I hope everyone in the US had a lovely Thanksgiving and for those who are outside the US I wish you many blessings as well. I hope we all can find something in our lives to be thankful for!

So, make it a great week and thanks for stopping by if you either came by to lurk or to leave me a lovely little note.


November 21, 2011

Magical Monday - Being Thankful & Colors

This week over at the Paper Cupcake's Challenge Blog; There's Magic In The Air. This week Gloria Westerman brings us our challenge. She would like to see us use Brown, Orange and Yellow on our cards/project, but with a twist....include/show "Giving Thanks" if can be words of gratitude or images...anything that shows being thankful....

I chose to do a more every day kind of card of thanks. I chose the image "Doodle Flower 3" & "Thanksgiving Tickets" by Paper Cupcakes. I used my Bic Mark-its to color my image and then I added some stickles. Punched a few butterflies. I kept this card clean and simple and I think it feels cheerful & happy.


Thanks for stopping by and for everyone in the US have a wonderful Thanksgiving day this week!